I'm not a fan of lots of bulky die cut foliage on cards, so I stamped three types of foliage in three different greens for the base then just added some embossed die cut berries and a couple of fussy cut holly leaves with berries, Then finished off with a small bow.
Kimber Kreations
Ex-Independent stampin' up! demonstrator uk, since 2010 Handmade cards, Rubber stamping, stamping techniques, card making ideas, Stampin' up Stampin' up, card making inspiration, scrapbooking, papercrafts.
Saturday, 23 August 2025
Christmas cards
I'm not a fan of lots of bulky die cut foliage on cards, so I stamped three types of foliage in three different greens for the base then just added some embossed die cut berries and a couple of fussy cut holly leaves with berries, Then finished off with a small bow.
Monday, 10 February 2025
Pancake maker /shrink plastic
Me thinks this is going to be a long post.
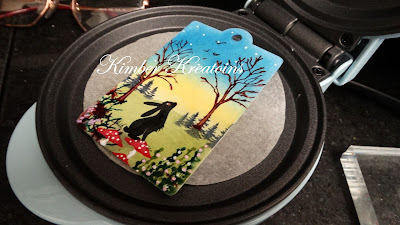
I have been experimenting with shrink plastic the last couple of days. In the past I haven't had a lot of joy producing anything worth keeping, but I recently saw a video where you shrink the plastic in a mini pancake maker. Yes you read that right a pancake maker. I wasn't entirely convinced this would improve my experiences with shrink plastic. I found a mini pancake maker for £14.99 So I thought I'd give it ago. It's Good!! no more having to hold the plastic down with a tool to stop it blowing away, no more worrying that its going to stick together as it curls and twist during heating and no indentation left but the tool holding it down. You just shove it in the hot pancake maker on a piece of baking paper, and leave it for 20 -30 seconds take it out and press a stamping block on top to flatten it out... Job done.
My biggest problem in the past has been finding a suitable product that colours evenly , not streaky and doesn't rub off or wash off. This post is going to be about the products I have been trying out and the pro's and con's I ve discovered along the way.
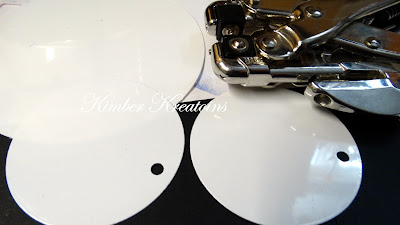
I die cut some tags and circles and punched a small hole in each piece so I can add a jump ring after shrinking.
Shrink plastic is glossy on one side and matt on the other. I have heard people saying you can you can work on either side, although this is true it's more usual to work on the matt side. The matt side is a lot easier to work on. It's easier to stamp on as it's not as slippery so the stamps don't slide around as much, and it traps in the colour better, especially if you are are using pastels or crayons. the glossy side is far too smooth for crayons and pastels to adhere to.
But which products work best. Well, Stazon ink is a great product for stamping on non porous surfaces like shrink plastic. But if you're wanting to use polymer stamps, solvent based ink pads are NOT recommended. Although I have at times, (but not on my favourite stamps) and I make sure I clean my stamps immediately after use.
For my first attempt I used Stampin' up dye based inks to blend a light and airy background on the matt side of the plastic. They went on beautifully.
I repeated the process on the test pieces and found the S.U ink lost most of it's colour, distress oxides lost some, Versafine clair and polychromos pencils stood up to the soapy water test and even scrubbing.
Friday, 20 December 2024
A blast from the past
Tuesday, 29 October 2024
Golden Rocking Horse
Hubby wasn't quite so sure about it though....Eww... that's different for you, not sure about that. I told him, I loved it and that it was made a long time ago, I just hadn't turned the card front into a card until just now. He walked away totally unimpressed and said no more. Which was probably just as well.
A tip I would like to offer now, is to use a smooth really intense black card, this wouldn't have turned out nearly so nice if I had used the... umm.... black card on sale in most craft shops that's pretending to be black.
I think this was a card I made using a sweet poppy brass stencil, which I picked up at a craft show some years ago, it retailed at around the £7.00 mark at the time.
I used a gold embossing paste through the stencil to create this golden rocking horse, (after removing the stencil from the paste and dropping the stencil into a bowl of warm soapy water immediately to soak)
I sprinkled some ultrafine diamond glitter over the wet paste and let it set overnight. The glitter stuck well to the paste and many years later its still sticking well.
Once the paste was completely dry and had hardened off I add a small red bow to the horses harness for a pop of colour. Then mounted the black panel onto a matching red paper and gave it a very fine 1 /16th of an inch border of red before adding it to my cream 7 x 5 inch base card.
As much as I like the look and simplicity of these embossing paste cards, I do not have a lot of patience or space to spare when it comes to waiting for things to dry or set hard, the consequences have usually been a total disaster so I mostly refrain from working with these types of products . Having said that...I am tempted to give it another whirl , that is, if my embossing paste hasn't hardened in the pot!
Thursday, 17 October 2024
summer silhouettes
I have made this 7 x 7 inch card before but in navy and crumb cake inks. I fancied making it again but in a different colour. So this time I used crumb cake and blackberry bliss.
I think this colour combo works quite well. The stamp set is an old S.U set called summer silhouettes.
Thursday, 10 October 2024
Post Box Christmas cards
I have been doing a little reorganizing in my craft room and I came across the post box stamp in these cards, It was one of the first stamps I ever bought. I was never happy with colouring mediums at the time. There were none of the quality colouring products that are available today. So I was always disappointed with the results.
So this stamp got packed away along with the rest of my meagre collection. That was when I decided stamping wasn't for me.
Since then, stamps and the products used with them have come a long way, making the whole experience a lot easier and more pleasurable.
So upon reacquainting myself with this lovely stamp, I decided to try creating a scene around the post box using Lavinia stamps.
After blending in the horizon and the sky, I stamped the postbox , masked it off and began building up the scene.
Using the edge of a piece of torn paper and a small blending brush with next to no ink on, I brushed in a few snow drifts.
I used copic markers to colour the post box and white Posca pen to add snow to the branches and create snowflakes.
This was the finished card . I enjoyed creating this card so much I decided to make a few more and tried to vary the background, by either using different tree stamps or drawing in the trees myself.
On this card I decided to draw in the background trees with copic markers.
I stamped a fence in but didn't line it up too well.
On the card below I added a rabbit and missed out a few trees.
Most of the stamps I used to create these scenes are from Lavinia's mini stamp collection.
The sentiments are from an S.U set called itty bitty Christmas.
The size of these cards are 4 x 8 1/2 inches.
Friday, 27 September 2024
The smaller witches
On this card I used all three of the smaller witches in the set and one of the small cats on this blended background. I added some tiny evergreen trees along the horizon and larger deciduous trees behind the witches. And an assortment of mini foliage stamps as silhouettes around the outer edges.
Wednesday, 25 September 2024
spooky house
This one I'm not so happy with. I loved the purple splattered background I started, but I didn't think one through before starting. But as I said, I was just experimenting with background colours.
Saturday, 21 September 2024
Halloween cards.
Sunday, 15 September 2024
Halloween cards 2024
Another Halloween card using the newly released witch bundle from Lavinia stamps.
I have used the same stamps as I used in my previous post below
I just changed the background colours. I used S.U dye based inks, regular stamping card rather than watercolour card.
Thursday, 12 September 2024
Halloween cards
I have enjoyed playing with these stamps after my long break from stamping.
Saturday, 24 February 2024
News
I have some news to share... After 14 years, I have finally dropped as a Stampin'up Demo.
I found there were not enough products in the catalogues I liked enough to buy. Which means I couldn't make my quarterly figures. So last month I decided to drop.
I will now be a customer and buy only the products I like, but from another demo.
I will continue with my blog as and when I make something worth sharing. You'll probably find my creations will be more varied now.
I have a few projects in mind I want to try. I think you'll love a couple of them. But it's going to take some planning and some time before I can get started. My craft room is due to get new windows in a couple of weeks, so I need to clear everything away and make space for fitters to work in. I don't want to start this project until the windows are done and I'm back to normal.
Laptop Mended I'm up and running.
Wow!!! I can't believe how long it's been since I last posted. It's been a few months now. There are a couple of reasons for this, the first being my laptop has been playing up for quite a while. To log on would take about an hour on a good day which was really frustrating.
The last two weeks it's been in the repair shop having new organs fitted and programs. It came home yesterday and I am now up and running.
The second reason is because, I haven't been making any cards. No handmade Christmas cards this year, no handmade Valentines card for hubby, and no Birthday cards. However , I have been kept very busy sewing.
We were supposed to be going to a wedding in October, as we were packing, I realized we didn't have any toiletry bags. This gave me the idea to make some. Everyone that saw them said they were lovely and that gave me the idea to make sets of travel bags for the granddaughters for Christmas. Then it was suggested the other female family members may like a set , either for Christmas or those with January /February birthdays.

There are a few different methods to put them together, I suggest watching a few tutorial and decided which way suites your sewing skills the best.
If you plan on making them in vinyl I strongly recommend using a walking foot or a teflon foot. for the top stitching.


