Showing posts with label . handmade cards. Show all posts

Wednesday 28 September 2022

Treat bags

I have been busy making batches treat bags for the boys I work with. I have given up on making the bags themselves in favour of envelopes. I seal them and then decorate the front differently each week. Once decorated I trim off the end so I fill the envelopes with sweets.  These are last week's treat bags. 

 I used torn paper to create the background mountains and brushed ink over the edges of the paper. Once I had covered the front of the envelope with colour, I began stamping the flora and fawner in purple for the distant objects and black for the foreground objects.


These little scenes  seem to be the boys favourite style of decoration for these bags.
They've even started to collect them. Which is a lovely compliment to me.


 I use stampin up inks and blending brushes, Lavinia stamps and Versafine Clare black ink for the silhouettes, Stickles glitter glue for some sparkly highlights.

Sunday 30 December 2018

LOTV Christmas Card

 I love this LOTV stamp of the little lad posting his very long wish list to Santa.
 I do tend to use it every year, but I try to change the colour scheme each time I use it. I used Copic markers to colour the image then with a white gel pen  I added the white snowflakes.

Wednesday 24 October 2018

So Santa


This is my first card with the new "So Santa" set. I coloured the image with Copic markers.  I used the retired embossing folder "Gently Falling for some background interest.
I am not a fan of wide borders, so I really don't know I chose to put a wide border on this card.  As I am looking at this picture,  I have the strongest urges to take this card apart and cut that border down.

Monday 22 October 2018

Piano Card

I saw a  beautiful version of this card on Pinterest,  but it didn't make sense to me.  I maybe wrong,  but I think it was designed to lay flat as it had a support built in to prop the top black layer up as though it were a real piano. So I decided to change it up so that it stands up like a regular card.

I used black glossy card for the top of the piano and Stampin' Up's "Sheet Music"  background stamp behind the piano top.

Friday 12 October 2018

Birthday wit card 2

Another card  using a sentiment from the birthday wit set. 
I have used some DSP for the background. This background paper is from the retired pack called Parker's Piece. 
This card is a 6x6  inches. 


Tuesday 18 September 2018

Mirror image stamping.

Remember that mirror image stamping experiment I posted last week. I have now turned it into a card using some wood grain DSP a sentiment and a little ribbon.

Sunday 13 May 2018

Remarkable You stamp set .. Magnolia 3


Another  card using the magnolia stamp from the Remarkable you set. this time I have randomly stamped the bloom over whisper white card stock and coloured the images with Copic markers. I then cut the card down to fit on the front of  two  6x4 inch base cards.
The sentiment is from a retired set called riveting.

Too Much Berry Burst.


Having bought the new Designer Series Paper  (DSP) last year,  I figured it was time to use it.
I bought the stamp set quite sometime before I decided to buy the matching. paper. 
The stamp set has some lovely sentiments in that I thought would be useful for scrapbooking,  as well as for card making, and I was right. 
I used a few of the stamps in this set in a wedding scrapbook I made last year. The stamp set is called Floral phrases. 
I used Berry Burst ink pad to stamp the image and text in the centre. 
The DSP is  Berry Burst too.  I never thought I'd say this, as I love the colour.  But this.... is too much Berry Burst for my liking.

Thursday 3 May 2018

Thinking of you,... on your first day at school.

 I loved this cute image from lili of the valley.
I think it's the perfect image for a child just starting school or changing schools.

This is a digital stamp and these can be resized to suit your needs.

I coloured this image with Copic markers.

Thursday 10 August 2017

Hogs and Kisses

I admit this is not the most exciting card or is it elaborate card I have ever posted and I am wondering if it is worthy of a spot on my blog.
I guess I was thinking,   less is more  while working on this one or maybe I 'd just lost my mojo.

I used the new stamp set from S.U. called "This little piggy" to create this card.

I coloured the imaged using Copic Markers and mounted it onto cardstock layer which I had stitched together using a zigzag stitch on my sewing machine.


My next post will be very long,  the project is very elaborate and I will probably bore you all senseless with my drivel on how  long it has taken and the how
project was created  That should make up for this rather under whelming card.

Thursday 26 January 2017

Fast card

For this very fast card,  I used the stamp set Awesomely Artistic from S.U. coloured with Copic markers.

Sunday 20 November 2016

Acrylic Block Stamping.

I have been neglecting my blog of late due to other commitments so I have some catching up to do now.

This little card was made by applying three different colour inks to an acrylic block, then lightly spritzing the inked block with water and  stamping the block onto water colour paper.

Once the ink was dry I over stamped the little tree over the inked patch.

I have to say getting the amount of water right so a little tricky for me. " squirts wasn't quite enough, but three was too much.   
As with most things, it takes a little practice, and thankfully water colour paper is pretty thick, so if you don't like the look you can flip the paper  it over and use the emergency side.


Saturday 20 February 2016

Stamping Problem.

This is one of this year's salebration stamp sets.
I have to say I have had more than a little trouble getting a good solid image with this large  greeting stamp.   (I have the wood mount version of this set.)

I know I am not the only person to have a problem with this stamp.

So today I decided to experiment with ink pads  and card stocks to see if I could get a better image.

Well, the short answer is yes I did manage to get a good clear solid image eventually, but it wasn't easy.

I tried my normal ink pads, which generally work perfectly well and found they were no good for this stamp. So they had to be re inked before my second attempt at stamping with them.

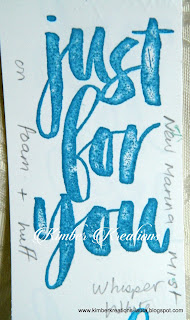
 So then I tried the new style stampin' up ink pads as they release more ink onto the stamp, therefore giving better coverage.

I was a disappointed to find  a couple of new pads were still too dry for this stamp. I tried using a foam pad under my card stock  before stamping the second image and still got a poor result.


I tried another more juicy ink pad  and  again I used the foam pad under the card stock.  Although I got a better result this time,  there were till areas that didn't stamp.

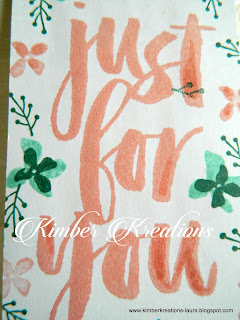
I tried to touch up the missed areas with the matching marker pen. As you can see the marker pen shows up a lot.


So I stamped it again using the same ink pad and foam, again there were misses but this time I touched up the missed areas with an aqua painter and a little ink. The result was much better, but still not  quite good enough for my liking

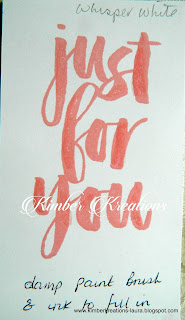
My next step was to sand the stamp lightly  with a fine grade sandpaper and try again.

This time I stamped the imaged with a  brand new, unopened, and much juicier ink pad and without foam pad under the card stock.
The result was better, but still not perfect.


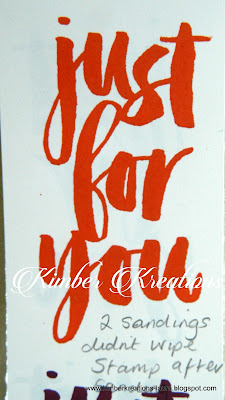
 I  then decided to give the stamp another  sanding, this time a little harder and mainly working on the thick downward strokes of each letter. As these are the areas of the stamp that are giving me most grief.  

This time it produced a pretty good, solid image  one that I would be happy use on a card.

I also tried stamping this image on three different white card stocks.

Photocopier card, I sometimes use  this for stamping and usually get reasonable results but for this, the results were very poor.
I tried chameleon card stock, which I use to stamp images on that I want to colour with alcohol markers. The results were not good.

Then I used my favourite  card to stamp on,  Whisper white card stock  from S.U.

 My Conclusion,  in my opinion  the best way to get a decent  bold, sold image with this stamp is to sand the stamp well, especially the thick, downward strokes of the letters.

Use a foam pad or old mouse mat under your card stock.

Use a very juicy ink pad to ink up the stamp, use enough ink on to form tiny beads of ink evenly over the stamp.
But beware of putting too much on and creating pools of ink.

My final tip is to press the inked stamp onto the card  firmly and hold it in position for  around 10-15 seconds to give the paper time to absorb the ink from the stamp.

If all this doesn't work for you,....... give up and throw the stamp away and make a cup of coffee.
No, seriously you could always  resort to  heat embossing it instead.
I have to say in my six years with Stampin' up,  this is the first stamp I have ever had a problem with.


Thursday 18 February 2016

Wilderness Awaits Stag card


I've never heard of anyone ever sending a card for a stag do, but why not??? 
The idea was obviously inspired by the stamp of the stag in the wilderness awaits stamp set from S.U.
This card will contain a special message for the bride groom  to kick up his heels , but also to take care.  
We wouldn't want him to end up tied to a lamppost minus his clothing or worse.

I used the tip of the pine tree in the  " Lovely as a tree"   stamp set along the base of the card along with a little sponging.

The background paper I made using a brayer and a texture stamp and two shade of green ink pads.   

Monday 25 January 2016

Card made from Christmas cracker


Boxing day Hubby and I went to my sister's for a meal. 
During the course of the meal my eye kept being drawn to the pretty holly patterned Christmas crackers that lay in pieces on the table.
I couldn't help but wonder how I could re use them.


I gathered up a few pieces and placed them in a pile ready to stash in  my handbag...When I wasn't looking my brother-in -law gathered them up and took them off to the bin.

Bin diving is not my favourite past time, so I sent my sister after him to rescue them before they got soiled and damaged in the bin.


This is a gate fold card I made with one of the Christmas crackers and a die cut sentiment, which I covered in red glitter.

I am not a fan of gate fold cards.
I am never sure what position to stand them in to show off the whole card, so I tend not to make them.


Happy Birthday Angie. 2016


Here is a card I made for my friend Angie's birthday last week. I used this years  free Sale a bration stamp set. It's called " What I love",  It's a two step photopolyer stamp set.
I die cut the oval panels, one in white and one in Blushing Bride card stock.
I stamped the solid stamp using Blushing Bride ink over 2/3 s of the  Blushing Bride oval. 
Then over stamped using the outline stamp and Versamark ink and heat embossed the outline image in white.
The sentiment is from the Perfectly Penned stamp set.  This set is my all time favourite  greeting set.
I adhered the pink oval on top of the white oval.
I cut a panel of Blushing Bride card stock  a little smaller than my base card and stamped the edges with the outline stamp and Blushing Bride ink for a little extra interest. and mount the oval onto the  rectangular panel with foam pads and added the sentiment, a couple of rhinestones and the bow.
Confession time......
I had no intention of  adding the bow, but I managed to get a tiny ink smudge on the white oval and I needed to cover it up.


Sunday 17 May 2015

Blossoms Abound in pink


I love this Blushing Bride ink and card stock from S.U.  so I thought I would combine it  with my new favourite stamp set  Blossoms Abound. Okay so the stamp set is an old one but it's new to me. 
I have  also use  this new cotton ribbon in Blusing Bride on this card. I love how S.U do ribbons to  match their card stock. 
 I really do love this ribbon,  being cotton there is little slippage, meaning my bows are less likely to come undone.   May have to invest in some other colours now.


Thursday 9 April 2015

Stippled Blossoms Again


Have I mentioned how much I love this is stamp set.

 Here's another card or two using this beautiful two step stamping set.  These cards are  8x6 inches in size.

The colours I chose are from Stampin' up.


Pretty in pink and raspberry ripple.
Pool party and Bermuda bay
Old olive and always artichoke
Crumb cake and Black memento ink.

There is a lot of stamping and masking in this card. I began by stamping the flowers and masking them off before stamping the leaves and chicken wire background.


 Okay so this is basically  the same card as above. I have just changed the colour of one colour  the chicken wire and mounted the piece onto Stampin ups Wonderful Wisteria dsp.

 I swapped the pool party and  Bermuda bay inks for  Stampin 'Up's,   Almost  Amethyst  and Concorde Crush ink pads for the flower and the chicken wire was stamped using the Smokey Slate ink pad.

The sentiment is from an SU stamp set called chalk talk.
The seam binding ribbon is from SU along with the designer series papers  (DSP) used for mounting these mini works of art.


Saturday 7 March 2015

Robert Addams Motorbike Die


Last Sunday Ange and I trotted off to Farnborough  to the Make It Show.
Going on a Sunday has it's advantages and disadvantages.  One disadvantage being the stall holders  tend to sell out of certain products.

But the advantages are, .. if they ain't got it you can't buy it, so you save money.

The main advantage being is that it is much quieter so you don't have to fight for a space to watch demos  or fight to get to the stalls, it's much more relaxed and some of the stall holder will give you a little discount on the last day.

Robert Addams had a stand there selling his massive range of dies. I didn't realise he had so many dies in his range. I knew he did a few wordy dies  and the motorbike, mini and campervan dies  (all of which are on my wish list). 

But I had no idea his range was so vast. I fell in love with the puppies, the kittens, the fisherman, the clock face the coggs and so many more.

 I was very good and only bought the motorbike die as I wanted to see how I got on with this type of die. 
Robert did tell me that the Motorbike die is fiddly but well worth the effort.

Well, my first attempt at assembling all the pieces had me in a bit of a tizzy which later turned into pure rage the more frustrated I got. 
I am sure the air turned blue as the  foul language flowed from my mouth. Thank goodness I was the only person home  that afternoon.

I got to the point where I was so despondent I was going to put all the bits in an envelope with a card   and send them to my brother with a message saying " here's the kit,  make your own bloody birthday  card." 
As a biker at least he would have the advantage of knowing where all the bits  should go.


I have to say that my frustration and anger was all due to my lack of patience and not watching the Video Tutorial on assembling  this motorbike first.
Having watched the video.....

My second attempted went like a dream.... and I now have a couple of tips to share with you.


1.  Watch the video tutorial before you even start working with this die.

2. Some of the pieces are very tiny  so be very careful to collect all 
the pieces and put them in a pot as soon as you cut them.

3. Watch video again after you have cut out all those tiny pieces.

4.If possible.. Watch video as you assemble the bike.

5. Use a black card with a sheen on it for the frame and wheels. 
It reflects the light giving a more realistic look and the debossed detail stands out more.

4. Ink the edges of the card used for the tank and mud guards. Use a slightly darker shade of ink in the same colour as the card you choose. It will add depth and give a more curved impression to the tank and mud flaps.

5 . Take your time this is not one to be rushed.


Now I have Just enough time to to stick down the mud flap and  then I must get this in the post for my Brothers Birthday. I do hope he appreciates all the effort that went into making this card.  In fact I may just send him a set of all the pieces  to make up just  for fun.

I'll post Robert's  video here too.

Monday 25 August 2014

Petite Petals Birthday Card.


Today's post is a card I have CASE'd from another SU demonstrator from Germany.
 I saw  this card on her blog and thought it was beautiful so I  just had to CASE it.
  I think what drew me to this card was her use of the Gorgeous Grunge splatter stamp.
She has stamped the splatters and heat embossed them in silver.
 The card looks a bit flat and uninspiring without this addition.

My card is not exactly the same  but its as close as I could get it without actually copying it stamp for stamp.   I will post the link to her blog
 at the end so you can pop over and see the original versions.  
You will notice  a few more changes that I haven't mentioned.

I am not sure what colours Annmarie used on her card as she doesn't list her colours on the first version of this card. She does list her colours for the second version.
I can tell you the colours I used. 
They were Blushing bride, Night of navy, and Raspberry  ripple.
Stamp set used were  Gorgeous grunge, Petite petal and Flower shop.


 The paler images in the top and bottom corners I inked up the small flower with Blushing bride ink and stamped it off once onto scrap paper before applying the stamp to the corners for a softer image.  Then inked up the stamp with the same ink and applied it directly to the card, which gave the stronger image.

Then I stamped the flower again in Night of navy directly onto the card and I stamped two images onto scrap card and punched them out with the corresponding punch for layering up. 

Using Versamark ink I inked up the splatter stamp, wiped down my card with an embossing buddy ( anti static pad) and stamped the image in the top left corner and the bottom right corner, covered the splatters in embossing powder and heated until shiny. 

The sentiment was also heat embossed in silver before punching it out with the word window punch and mounting it on to Blushing bride cardstock.

The central flower is a stamp from the Flower shop stamp set. I used Raspberry ripple ink to stamp this image on to scrap card. Then used the same ink along with a water filled paintbrush to colour in the image.  Once the  ink was dry I punched out the large flower with the corresponding  punch and  added the smaller flower to the center with a small, thin sticky foam pad placed a sparkly in the  center of the flower and adhered it in place on the front of my stamped background. 

The final steps were to add the rhinestones and  mount my finished work onto a piece of Blushing bride cardstock, then onto  Night of navy cardstock and finally onto the 7x5 white base card.  

All that's left for me to do now is create the insert and get this in the post to a special lady for her birthday.

But before I go here is the link to Annmarie and Andrea's  post for this beautiful and  inspiring  card.

http://firsthandemotion.blogspot.co.uk/2014/02/petite-petals-in-pastell.html