Wednesday 22 December 2010

My Christmas Tree Greeting

Like most of you I have been busy preparing for Christmas. Shopping for presents, shopping for food, decorating the tree, preparing the house for the guests, making my menus and place cards for the table. The list of things to do goes on and on, So I haven't had much time for crafting and blogging. So I am just taking a few minutes out now to wish all my friends, family and customers a very happy Christmas and a happy, healthy and prosperous 2011.
I am hoping to spend a little time in my craft room sometime over the holiday as I had lots of stampin' up products for Christmas. But for now,.... Family comes first.
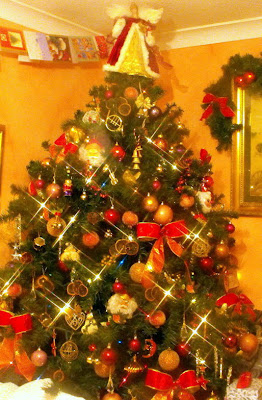
Can you see which part of my tree I used for the background of my Christmas Greeting?
lol

Monday 20 December 2010

Guest map just for fun.

I have added a guest map to my blog just for fun, so you can put a pin in the map to show me where in the world you are viewing from. Doesn't the internet make the world a very small place. You can also leave me a message if you wish. I would love to hear from you.
Perhaps give me some feed back, let me know if my posts are of help or interest to you.
Perhaps you could even give me some tips or ideas.
I have to say that overall most of my visitors seem to be from the USA, which is kind of exciting but scary too. The american have been using Stampin'up products for years, whereas we here in the uk have only been able to buy them for about three years. I myself have only been able to buy them in the last year.
Working (or should I say playing ) with Stampin' Up products and blogging are new to me.
So it amazes me that crafters in the USA would take an interest in my little ol' blog.
They must have seen it all and done it all before,...and I am just experimenting.

Sunday 19 December 2010

Christmas Dinner Menus


This Christmas I am cooking Christmas dinner for hubby's mum, brothers, sister in law and Kris
It will be fun trying to fit us all around the table. Better make sure they all use the bathroom before sitting down to eat as I'll need a can opener to get them out once seated.
Anyway I decided to make Menus to go on the table, not only will it answer the guest s questions as to what's for dinner. But it will also remind me what I am supposed to be cooking so hopefully I won't forget anything........Well, that's the plan! but we all know what happens when we make plans.
Anyway, I never thought I would buy the "compliments to chef " stamp set from stampin' up, but last week I had this crazy notion to make menu s for Christmas day.
Alan's mum always says I do a nice table and I don't want to disappoint her this year.
I have chosen the baja breeze card stock as it is the closest colour to my tableware. I stamped the cutlery in versamark ink onto whisper white card stock and embossed with silver embossing powder. I did the same with the menu stamp . The decorative border was stamped and embossed onto baja breeze card and trimmed down to make the band running across the white card. I used versamark ink again and stamped the watermark "bon apetit " background. I then typed up my menu insert on my computer.
Adding comments next to some items for a touch of humour. My footnote was a public health warning... Any complaints.... keep them to yourself. DO NOT tell the chef or she may use the carving knife on you. Good job they all have a sense of humour.

The colour of the card stock looks a lot brighter in this photo due to flash.

Sunday 5 December 2010

Pink and Navy Floral card.


This one is a bit more involved. It might make a nice Mother's Day card.

The boho blossom punch used again here this time it hasn't been cut down to make hands or feet.

The Christmas ornament punch has had the point chopped off and the hanging bit snipped out with a small circle punch to form a vase. I used white craft ink and a stamp from an SU stamp set that is longer available, (so it doesn't really matter that I can't remember the name of it) to stamp the pattern on the vase and the background. The leaves are the branch from the bird punch.

The pink paper is SU's designer paper.

Punch art ideas


Two more punch art items the bat wings were made from two of the middle size oval punch from SU. I cut away the wings with a small circle punch. The body and head are just circles with a dimension in between.

For the penguin I used the word window and a circle for the hat.

Ovals in all sizes for the body and wings the head and eyes circles.

The feet were created with the boho blossoms punch.

Cheeky Monkey


Here's a cheeky monkey I created from a selection of SU punches.
The boho blossoms punch for the hands and feet the rest were circles and ovals in all sizes.
All the edges were daubed with ink before putting him together. I am afraid I was a bit sloppy with the glue on one leg, hence the fact he hasn't made it to a card front yet.

Santa's helper

This guy I found on a canadian demonstrator's web site. He is so cute. I just had to try making him. There is a video on making this guy on YOU TUBE. I can't remember the title of the video,
but I am sure you'll find it with these clues to help. Stampin up punch art, Andrea Walford.
Really Sorry I can't be more helpful.
Andrea makes some wonderful things and a visit to her web site is time well spent.

You'll need the Christmas ornament punch, the Boho blossoms punch and small circle punches. Card stock in a variety of colours, a white Gel pen, sponge daubers, pretty in pink ink, stamps to decorate your parcels.

You're a Star

This would be a good card for a male.
It could say Happy Birthday or You're a Star.

I used the SU star punch a piece anita's silver paper (which actually feels like light weight card) and embossed it using the paisley cuttlebug embossing folder.
I stuck the star onto whisper white card stock daubed the edges with Night of Navy ink, mounted that onto navy card, then mounted it again onto white card and again onto my navy background card . ( see below for details on how to achieve this effect.) Then the whole thing
mounted onto a white 5x5 card base.


To make this background paper


I used the star punch from SU
punched out one star and used it as a mask. I daubed around the star with night of navy ink then moved the star to the next position daubed round the star again and kept repeating this process until I had the desired effect. I then cut my new background paper to the size I wanted for my card.


It was as simple as that.

Thursday 2 December 2010

Snow Day s Whoopie!!!!!

Perhaps I shouldn't sound so please about this, but I have just been told school will be closed tomorrow as well as today.... WHOOPIE!!!!!! I LOVE SNOW DAYS, time for some crafting I think.
Maybe I ought to catch up with my housework first. Have to keep hubby happy. lol
I had a little play today in between doing a few chores will post new stuff over the weekend .

Saturday 27 November 2010

Christmas Ornament Punch

This is very similar to a card I posted a few weeks ago but this time I have used the New Christmas Ornament punch from Stampin up.
This is not the exact shape and size of the punch as I shaved a little off the end to used on another project and this was the piece that was left over. I hate wasting card and I decided to use this slightly reduced ornament shape anyway.
So I daubed the edges with cherry cobbler ink, embossed the snowflakes with silver embossing powder and added a knot of real red grosgrain.
I then stamped the flourish from the season of joy stamp set onto white card stock using the basic grey ink pad, stuck the bauble over the lower part of the flourish and stamped Merry Christmas at the bottom.
Finally, I mounted the whole thing onto real red card stock.

Nick's Prehistoric Birthday Card


This one is for Nick who has reached the grand age of 50 today.
Happy Birthday Matey.
It's not all bad being 50, so don't frett too much. You have excellent company.
Besides, the optician can sort out your failing eye sight, the Dr can sort out a hip replacement and the dentist is on hand with some dentures when needed.
On the plus side Nick, You haven't quiet reached your second childhood.
Have a GREAT DAY!


For this card I used the small oval punch for the muzzle, the five petal flower punch for the ears, the 1 3/8" circle punch.
the word window punch for the eye lids and the small circle punch for the eyes.
I daubed each piece with basic grey ink before sticking the pieces together and added white spots with a white souffle pen.
I drew in the mouth with the fine end of a stampin' up marker.
The background was created with sponge daubers. I used old olive for the trees and grass, bashful blue for the sky and for the water I used my sponge daubers with marina mist, pacific point and night of navy ink pads, then dotted on some sparkles with the white souffle pen .
It is possible to create a large dinosaur or Loch ness monster)
using the larger oval and circle punches as I have done here. ( I am starting to think of this more as Nessie than a dinosaur )
The only piece I had to cut was the neck, which shouldn't be too much of a challenge for anyone.

Friday 26 November 2010

Mr Piggy

This gorgeous fat piggy was made using four circle punches and the five petal flower punch (all from SU)
I daubed the edges with creamy caramel ink using a sponge dauber.

The fence was created using the train tracks wheel stamp and white craft ink (both available from SU) I filled in the little gaps in the fence with a white gel pen. Stamped my foliage, daubed and drew in the grass and the daisies.

Can't quite think of an occassion one would use this card for apart get well soon. Perhaps it should read
" I hope you're cured soon."

So If anyone has any other suggestions , please tell, I would be delighted to read them.

Clare's card

The stripey pink paper is from Stampin' up, as is the cupcake stamp set I used to make this card.
The stamp set is called crazy for cupcakes and it's about the only stamp set I remember the name of.
The lacey edge was punched with the new lace edge punch from stampin'up.
I used Stampin up markers , copic markers and a white souffle pen to colour the cakes and stand.
The card stock is SU's pretty in pink.

For Clare, Happy Birthday


It's Clare's birthday today and she will be receiving this little bag with some gift vouchers later today.
I think I am safe posting this before she gets this.
I expect she is far too busy to be reading my blog.
I used the Stampin' up's Stripey paper for the bottom section of the bag and added a
co ordinating pink card flap. A sticky foam pad as the closure and a flat back pearl to represent the fastener.
The bird punch from stampin' up came in handy again for the foliage for the spiral rose.
Pale pink grosgrain was used to make the handle.
The template was purchased from our local craft shop.

Saturday 20 November 2010

Gift bags

Two cute little gift bags using stampin' up's paper several circle punches and the lace edge punch, a white gel pen and a little co-ordinating bow.

Friday 19 November 2010

Christmas ornament card.


With my new ornament punch I created this card using real red and marina mist card stock , season of joy stamp set, a versamark pad, Cherry cobbler and marina mist ink pads, daubers and silver embossing powder.

I daubed the edges of my punched ornaments with co ordinated inks. I allowed the ink to dry then

stamped my images with versamark and applied the embossing powder and heated until melted. I drew in the hangers with a silver gel pen.

I then stamped and embossed the greeting.

Tuesday 9 November 2010

Snowflake Christmas card

The acetate window sheets were used for this see through card.
I stamped the acetate with Stazon using the serene snowflake stamp set .
I stamped the navy card with one of the larger snowflake stamps in the set, but this time I stamped it with shimmer paint . I applied the paint with a sponge dauber to the stamp taking care not to flood the stamp with paint.
I set one of the new stampin' up jewels in the centre of the snowflake and then placed three more jewels on the far side of the card.
I used the new stampin up lace edge punch on the side of the card.
This was then layered onto whisper white card and mounted on to the acetate base card.
I cut two pieces of whisper white card the same size and stuck one inside the card for the greeting and one on the back of the card, by doing this you hide the adhesive strips and it also gives you somewhere to stamp your,..... "Handmade by Joanna blogs"

"Time for bed "said Zeberdee....... and tonight, I will go willingly zzzzzzzzzzzzz

Margi 's card


Margi 's card was an experiment with hot foiling on dark cardstock which was slightly textured.

This was the result. As anyone who follows the stars will know, I am a bit late posting this, as Leo birthdays are in the summer.

I found some wonderful Zodiac clip art on the internet and used the "Leo the lion" for Margi's card.

I hope she liked it .

Gift box with Lily top


These Lillies were a doddle to make. Unfortunately you can't see the daubing around the petals very well in this photo.

I used the largest oval punch from stampin up to cut six petals the boho punch for the base of the lily.

The lace edge punch for the trim on the lid and daffodil delight ribbon.

I used scissors to make the stamens and leaves.

I wish I could take the credit for designing the flowers on this one but they were designed by another demonstrator and I can't remember her what country she was from, let alone her name.

Thursday 4 November 2010

Glitter Heart Cards


These two cards were very quick and
simple to make, they had to be as it
was quite late when we got home from my mother -in-laws with my Stampin' up parcels .
I didn't have much time to play before going to bed.
I used the small Stampin' up heart punch, whisper white card stock Rich Razzleberry ink and the Plum/ burgundy Cosmic glitter which is so very close to Rich Razzleberry in colour I usually call it Razzleberry glitter.
I used razzleberry grosgrain and cardstock for the second card. Don't forget you can click on image for a closer view and then click again for even close view.


Friday 29 October 2010

Punch art card

This was fun to do and very easy.
Oh I wish I hadn't said that. I am demonstrating this card tonight it's all bound to go horrible wrong now I have said that.
I apologize for the poor quality of photo.
Had afew problems with my camera s

Materials and tools used...
5 point flower punch
Round scallop punch for the scales
1 3/8 circle punch for the body
small circle punch for the eye
bird punch for the leaves.
Daubers
Crystal effects for eyes
White gel pen for the eyes

Whimsy wheel, for the sea
white craft ink,

to daub the punched shapes
old olive ink, marina mist ink,
Taken with teal ink.

Card stock
marina mist,
pacific point
night of navy
scraps of olive pink and teal.

Tuesday 26 October 2010

Handsome Prince or just a frog?

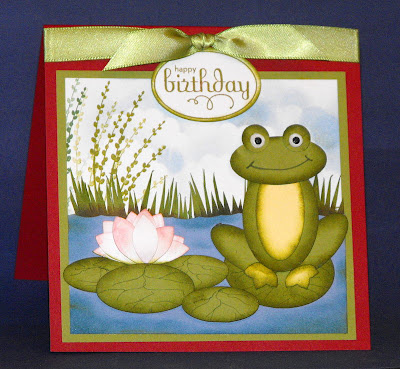
Well, this is the card that has taken up most of my day.


Playing around with card, ink, daubers, crystal effects, stamps, punches and scissors is my kind of heaven.

Anyway The Frog and the lily pads are mainly made up of ovals, all daubed with old olive ink. I used the five point flower punch for the lily daubed with pretty in pink ink.

The reeds are old olive card daubed with olive and chocolate chip ink and cut with scissors.


The sky I daubed using bashful blue ink and a scallop circle as a mask for my clouds.

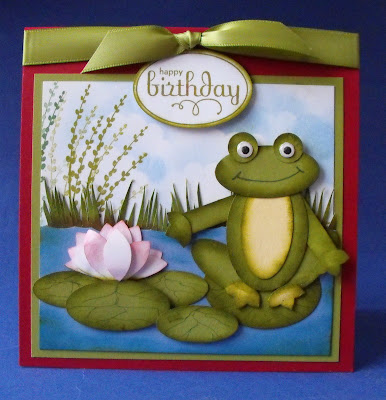
I am quite pleased with the way this card has turned out.........I may not think that way after my opticians appointment. tomorrow. If she says I need stronger glasses, I will be worried about the standard of all my work. lol.

Ok , It's spot the difference time.
Something bugged me about the frog on the above card. After sometime pondering, I realized what it was.
Which do you prefer?????


Giraffe Card


I have finally decided ,my New favourite colours are Stampin' up;s Cherry cobbler, Pacific point and Marina mist. Ihave really enjoyed having a play with all my new goodies. Today I thought I would have a go at punch art. Not something I have ever seriously tried before, but hey!!! I have new punches so why not give it a go. Here are some of the things I produced.Fran will think this is the giraffe I half heartedly made months ago and she named George. Sorry Fran, this is his baby brother. lol. He is smaller than George. He is made from an assortment of oval and circle punches.

I used bashfull blue ink and a dauber plus a scallop circle to do the sky.

The tree tops are old olive card punched out using the scalloped circle and oval punches.

Click on photo for larger image and use the magnifier.

I have Yet to put the greeting on this card and I think it has to say......... Hi

Sunday 24 October 2010

stampin' up ink storage . plus update


At long last my birthday present finally arrived from the usa. It has been designed especially to hold stampin' up inks. But it is not a stampin' up product. I love this ink storage system it has certainly made finding the colour ink pad I want much easier than fumbling round in drawer. It took three months to arrive as it had to be made and the carriage charges amounted £90 that was £20 more than the cost of the unit. I think we would have been better off finding somebody in the uk to make it.


Having said that, I am glad I have got it, it fits beautifully into the only space I had available.


as you can see, I still have a few spaces to fill with markers and re inkers.


It's been over a year since I Darling hubby purchase the ink storage unit for me and I have to say it's still a fabulous piece of storage, I still love it. I haven't regretted my choice of storage unit at all. I have had a couple of enquiries as to were I got , so I am now going to post details here for you . http://www.suink.net If you are an SU demonstrator or a serious S.U ink collector, I would advise you to buy the largest unit you can afford it does not take long to fill them up. Over the last two years I have collected so many ink pads my unit is full and now I have a stack of pads that just sit on my desk....... until I knock them over

Bunny card


I used a range of stampin'up punches to make this cute bunny. Close to cocoa , pretty in in pink and white card stock for the bunny and stampin' up's designer paper for the background. Again the greeting was printed off and hot foiled. I used crystal glaze for the eyes.

Harry the dinosaur expert in the family.


This card mas made using Stampin' up 's lovely as a tree stamp set, old olive, wild wasabi, chocolate chip, sahara sands, so safron, bashful blue and more mustard ink pads. With daubers.
The dinosaur was punched from old olive card and certainly celery card stock using three differnt sized circle punches three oval punches and the boho flower punch for his hands. Oh yes the scallop circle punch for his tale. I almost forgot that one. I did use a couple of small foliage/grass stamps for the foreground which were not from stampin up.
Once I had completed the picture, I mounted it onto old olive card stockand then placed the whole thing onto a sheet of stampin up's designer paper.
I added a piece of bravo burgundy grosgrain.
and printed off a personalized greeting and hot foiled it. I then punched it out and mounted it on to a larger punched oval.
I didn't get to see Harry open this card, but I do hope he liked it as much as he loves his dinosaurs. Happy 4th birthday Harry!!!

Wednesday 13 October 2010

Christmas card


Marina mist ink and card again, I do love this colour.
I used stampin up's "lovely as a tree" stamp set, daubers, "serene snowflakes" stamp set and the deer from the "winterpost " stamp set.

Moving house Card


For this I used the now retired stamp set loads of love and loads of love accessories. I daubed the sky with bashful blue ink and used my daubers to put in some streaks of green then over stamped with the tree. I stamped the pick up onto patterned paper it cut out , I cut out the window too.
I added a white piece of card behind the window on which I had stamped the couple added some acetate for the window.
I used so saffron ink for the ground.
I mounted the picture onto green card stock after I had punched the corners, then punched the corners again. The brads are faux brads using the technique I wrote about in the instructions for the waistcoat card below.

Christmas bauble card


Here's a nice and easy card to make. I punched out a circle using Stampin up 's largest circle punch daubed the edges with marina mist and pacific point ink stamped it with the serene snowflake stamp set and the flourish from season of joy stamp set, added some dazzling diamonds glitter and marina mist ribbon. it's as simple as that but very effective. Well I think so.

Sunday 3 October 2010

Dress Card


This little dress card was time consuming but fun to do. I cut the dress in lilac card stamped it with the polka dot background stamp using white craft ink then daubed the edges with perfect plum ink bringing the ink further up the dress to give the impression of folds in the fabric. I then cut out the dress again but this time much shorter cut away the sleeves, stamped flowers along the bottom, daubed the edges and ran it through my spellbinder wizard in the swiss dots cuttlebug embossing folder.
I then punched a lace trim ran it through my crimper to give the impression of pleats. Then I stuck it to the back of the apron, added lilac ribbon and stuck the apron onto the front of the dress.
The collar was made using the large scallop circle punch and the 1" circle punch.

Friday 1 October 2010

Man Card


A Man s card at last.....these are the hardest cards to make in my opinion. I cased this design from another demonstrator.
It was easy to make once I had worked out the template for the waistcoat and I really like the result.I used the very vintage wheel stamp and some daubing round the edges.
Ink pads: Night of navy and Soft suede.
For the buttons I punched five small circles stuck them in position and added a drop of crystal effects to each one to give the buttons dimension.
The tie pin was created by punching one tiny circle in silver card and a smaller circle from card stock again I used one drop of crystal effects and once it was completely dry, I stuck the smaller circle on top of the foil circle. You may like to know that the Brads holding the greeting onto the navy card are not brads. These were created the same way as the buttons.

Laura's Cupcakes

I have always said I am never going to put my cakes on my blog and here I am doing just that. Here are a few of the cupcakes I made for my mother in laws 90th birthday.
But I spent an age making all the flowers, butterflies and glittery hearts and it seemed a shame not to show you.
Some were chocolate sponge which were very rich and chocolatey and the others were coconut sponge. I used Betty Crockers chocolate fudge frosting for the chocolate cupcakes. For the coconut cupcakes. I made a frosting using mascapone cheese, which was absolutely gorgeous.
Fortunately, I had made more than I needed, which was just as well as the guests were not satisfied with just one.
At the end of the day the guests were forming a queue to take some home.... A compliment if ever there was.

You can't see it in these pictures, (unless you click on the photo for a larger view and then click on the new photo that pops up.) but all the cakes had a dusting of edible glitter. Which I have to say may be edible but it certainly is NOT digestable.... the result being, .... sparkly poohs the next day.

I am afraid the photo has a pink tinge to it as we were in a red gazebo.

Tuesday 28 September 2010

Baroque


This was another of stampin up stamps I really wasn't sure of, but having done some research on what you can achieve with it and the fact it is being retired at the end of this month were reason enough for me to order the large baroque background stamp.

I swiped the ink pad over the stamp rather than tapping it as I wanted a streaked effect.

I used the new baja breeze ink pad with chocolate chip card and grosgrain.

Christmas easle card


This was a bit of an experiment really.

The bauble.

I used my largest circle punch to punch a hole in some scrap card and used the hole in the card as a stencil. I took a dauber and real red ink pad and daubed the outside edges of the circle working my way into the middle. I wanted the colour at the edge to be much stronger than in the centre.

I removed my stencil and dried the ink with a heat tool.I then stamped the snowflakes with versamark ink and embossed with silver embossing powder. Using my large circle punch again I punched out the bauble and mounted it onto green card which I had stamped with a pine needle stamp and glittered using a quickie glue pen and stampin up's green glitter.

Added a red bow and mounted onto red plaid paper then onto greencard then onto my easle card base.

Of course you could just ink the edges of the circle you punched out at the begining with your dauber.

My original intention was not to punch it out the end. I intended to stamp my pine branch directly onto the same piece of card as the bauble, but for reasons only known to me, I changed my mind.

Click on the photo for a larger view.

Christmas Card


Serene snowflakes and lovely as a tree were the stamp sets used on this brayered background.

I used the brayer with bashful blue and night of navy ink pads. I then stamped the trees in black and with a dauber added some streaks in navy below the trees. I then stamped the snowflakes using versamark ink and embossed then with silver embossing powder.

Wednesday 22 September 2010

Toner foil/ domestic iron trial update

Well, said I would update you on the toner foil, laser print, and the domestic iron technique....... WELL, IT WORKS!!!!!! Much to my surprise I managed to get the temperature just right first attempt. My paper didn't suffer too much either.
This is definately a technique worth a trying if you have a laser printer and want to spend £6 on a roll of toner foil.
This technique is easy, you print off your design or your greeting using a laser printer or photocopier (that uses toner, not ink jet. ) place your foil over your design ( shiny side up, dull side touching your design )
Lay a sheet of paper or very thin card over the top and iron the top sheet of paper/card for a minute or so. Do not press down too firmly , it's the heat you need to get the foil to transfer, not lots of pressure. You will damaged your paper if you press too hard. If you are using a steam iron.... use it as a dry iron ... NO STEAM.
Allow the foil and paper to cool , just a few seconds should be enough, then gently remove the foil sheet. Providing you have got the temperature setting right you should end up with a beautifully foiled design .
You will probably have to play a round and do some tests to work out what the best temperature setting is on YOUR iron.
On mine it was around the medium heat mark.
One final word of advice choose your designs carefully. Try black and white clip art, make sure the edges/ lines in your designs are crisp and clear and they don't have too much shading . Remember the foil will stick to every toner line in your design if there is alot of shading you will lose your design. Practise on very small designs to start with so you don't waste too much foil.
Hope you find this helpful.

Tuesday 21 September 2010


Another of the card kits prepared for me by my sister.

Now she knows.......and everyone knows, I don't like this stamp set.

So I was a little surprised she chose this set of stamps for me to use.

Much to my own surprise I actually ended up liking it.

But Not enough to buy the set. LOL. I think I'll just borrow now and again. hee hee .


Another one from my afternoon cardmaking with my sister. Using Lovely as a tree stamp set, soft suede and close to cocoa ink.

I have made this one again since but this time I only used chocolate chip ink and grosgrain instead of the ribbon.

Christmas card


Another cased card, I love the razzleberry and found the cosmic glitter went perfectly with it.
I used the new cake crumb card stock to mount the word stamp from the season of joy stamp set after mounting it onto razzleberry card.


I had a lovely afternoon with my sister sharing make and take cards on Saturday This was one of the card kits she produced for me. I love the colour combinations and surprisingly I fell in love with a the stamp set used...... up until saturday I had always dismissed it. I have now ordered it..... but don't tell hubby.


Serene snowflake stamp set, white shimmer paints and a touch of dazzling diamonds glitter were used to make this quick and easy card.

Jacks Card


This is one I cased from another demonstrator, it appealed to me so I just had to make this for my step grandson Jack.

The backing paper is a stamping up paper that will be discontinued at the end of this month as the new catalogue is launched.

I have a few of catalogues left so rather than buy this paper I used the page from one of the catalogues.

I used old olive ink with the elephant stamp from the set animal stories.

Thursday 16 September 2010

90th Birthday Card.... well, sort of.


I was having crafters block the week before my mother in laws 90th birthday. I usually do something flowery and pretty for her but this year, I wanted to do something different & special, but the ideas were not forth coming. Then I found a pack of certificate paper buried under papers on my printer, my mind started to wander.......as it often does and minutes later I came up with the idea of a 90th Birthday Certificate......Well,... not many people get to see 90, so I thought she deserves a certificate just for that.
She loved it!!!!! and is having it framed to go on the wall.... How about that then.
I am sorry the photo is so poor I just couldn't get it any clearer than it is. Click on the photo for a larger view.

Post it note cover & pen holder

This little post it note cover was made from
stampin up 's real red card stock , stamped with
the flourish stamp from the season of joy stamp set embossed with gold embossing powder.
I used the word stamp from season of joy for the top layer of the cover. Added a little real red grosgrain knot, some green comic glitter to the flowers , tree and snowflake.
For the inside, I used the same flourish stamp, but I used the real red inkpad to stamp around my label. I used the, " to: from:" stamp from the winter post stamp set and stamped it in basic grey. I very rarely use black ink to stamp anything. I find it too harsh and the result reminds me of a children's colouring book. I personally think you get a far better result using a grey ink, especially if you are going to colour in the images you have stamped. The short, Sharpies pens fit beautifully into the holder.
I think this would be a perfect little gift for a childs teacher as most of the teachers I know get through mountains of post it notes every year. So I think this would be a welcome gift that doesn't cost the earth.
Your child can fill in the " To and From" so the teacher will not forget who gave it to them.