Me thinks this is going to be a long post.
I have been experimenting with shrink plastic the last couple of days. In the past I haven't had a lot of joy producing anything worth keeping, but I recently saw a video where you shrink the plastic in a mini pancake maker. Yes you read that right a pancake maker. I wasn't entirely convinced this would improve my experiences with shrink plastic. I found a mini pancake maker for £14.99 So I thought I'd give it ago. It's Good!! no more having to hold the plastic down with a tool to stop it blowing away, no more worrying that its going to stick together as it curls and twist during heating and no indentation left but the tool holding it down. You just shove it in the hot pancake maker on a piece of baking paper, and leave it for 20 -30 seconds take it out and press a stamping block on top to flatten it out... Job done.
My biggest problem in the past has been finding a suitable product that colours evenly , not streaky and doesn't rub off or wash off. This post is going to be about the products I have been trying out and the pro's and con's I ve discovered along the way.
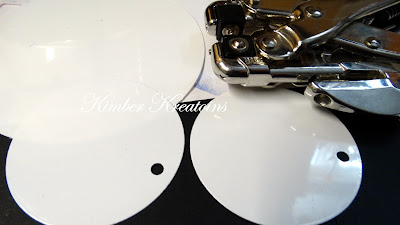
I die cut some tags and circles and punched a small hole in each piece so I can add a jump ring after shrinking.
Shrink plastic is glossy on one side and matt on the other. I have heard people saying you can you can work on either side, although this is true it's more usual to work on the matt side. The matt side is a lot easier to work on. It's easier to stamp on as it's not as slippery so the stamps don't slide around as much, and it traps in the colour better, especially if you are are using pastels or crayons. the glossy side is far too smooth for crayons and pastels to adhere to.
But which products work best. Well, Stazon ink is a great product for stamping on non porous surfaces like shrink plastic. But if you're wanting to use polymer stamps, solvent based ink pads are NOT recommended. Although I have at times, (but not on my favourite stamps) and I make sure I clean my stamps immediately after use.
For my first attempt I used Stampin' up dye based inks to blend a light and airy background on the matt side of the plastic. They went on beautifully.
Then I stamped the rabbit and trees in using the forbidden Stazon.
The purple trees in s.u. ink. For the foreground I used Versafine clair ink and a few highlight dots using a Posca pen.
Time to shrink... pop a circle of baking paper in the base of the pancake maker to keep it clean and to make it easier to remove the hot plastic after shrinking.
A tip I would like to share is before you get any colouring products near your shrink plastic cover the glossy backside of you cut out shapes with painters tape to keep the back clean. If you leave some tape overhanging you can use this excess tape to hold and move your project around so you don't get your finger in the wet ink and spoil your work.
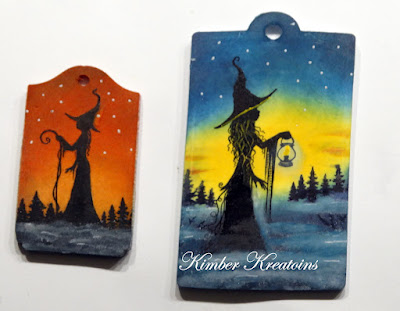
As you can see during the shrinking process the colours intensified considerably, making it almost too intense and dark. I recommend using lighter colours initially, until you know just how intense your chosen colours are after shrinking.See the photo above, of the pieces before and after shrinking.
My next test was to wash the piece in soapy water to see if the inks stayed on. My reasoning for this is because I wanted to turn these pieces into earrings and I don't tend to take my earrings out when I have a shower so these pieces needed to stand up to shampoo and shower gels.
Sadly, They didn't all pass the test. the background colours have washed away. Therefore I am not going to recommend S.U inks on shrink plastic as they have almost completely disappeared. The Stazon lived up to it's name and stayed on. Versfine ink and posca pens did ok.
Next was to try out distress oxide, Versafine clair and polychromos pencils on some shrink plastic offcuts.
I repeated the process on the test pieces and found the S.U ink lost most of it's colour, distress oxides lost some, Versafine clair and polychromos pencils stood up to the soapy water test and even scrubbing. Above is the photo of the samples before shrinking and washing and below is the photo of the inks after shrinking and washing.
You can see the S.U ink has lost most of it's colour and the distress oxide has lost a little colour but the Polychromos pencils and the Versafine clair have stayed on and intensified.
I decided to try out a couple more products, water colour pencils, normal colouring crayons, and pan pastels. I really wasn't much from the pan pastels but I was really impressed with the result.
Water colour pencils with and without water. Normal crayons, posca pens neat and diluted.
After shrinking, you can see the colours have intensified and stayed on.
All stood up to the tests. Although the water colour pencils puddled a bit leaving an unevenness I didn't like, and it took longer to dry.
Posca pens neat and diluted stayed on well as did the normal crayons.
Now I have some idea on how things are going to work, it's time to play on some real projects...fingers crossed.
You maybe confused by my side notes, I've written Versamark, that should read Versafine Clair.
If you get a missed patches when stamping, load a small paintbrush with the same ink and fill in the misses.
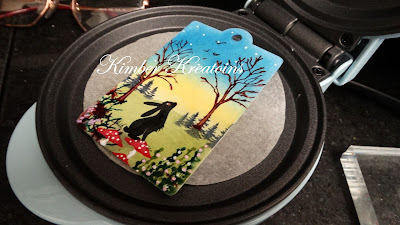
You may notice some faint leaves at the top and toadstools at the bottom .
I just wanted to map out their position and paint them in with posca pens. so I took a clean dry stamp and stamped where I wanted them to go. The dry stamp removed enough ink from the plastic for me to see where to paint them.
Note the overhanging painters tape at the top of the witch.I did several post box scenes.
These ended up as a zip pulls.


